How to Install an Undermount Sink

How to Install an Undermount Sink

September 10, 2021


Undermount sinks can be more challenging to install than inset sinks. Are you also brainlessly facing that one undermount bathroom sink not knowing how to start working on it? Today, we give you some guidelines and help. Learning how to install an undermount sink has challenges, but following directions when placing these types of sinks can ensure your room has a stylish look.


1.What is an undermount bathroom sink?

An undermount bathroom sink, as the name suggests, is a sink that is mounted underneath a countertop in the bathroom. Drop-in sinksare mounted to the top of the counter top. 

The “hidden” edge of the best undermount bathroom sink has an attractive, streamlined appearance, and the lack of crevice or a lip makes the edges less likely to catch dirt. 

Popular materials for white undermount bathroom sink include ceramic, porcelain and cast iron, and they can come in rectangular undermount bathroom sink and oval undermount bathroom sink. 

Porcelain undermount bathroom sinks are recommended for granite, solid surface and quartz countertops, but may not be as effective with laminate. They can be more expensive than drop-in sinks. 


2.Prepare and Cut the Countertop

140x140


1)Chose the location for the porcelain undermount bathroom sink installation, which may be dictated by the location of the water supply lines and other plumbing fixtures in the room.
2) Measure the hole for the undermount bathroom sink. The easiest way is to turn the sink upside down and trace the outline directly on the countertop with a pencil. Some undermount ceramic bathroom sink include cardboard templates, which can be used to trace the sink hole.
3) The outline will be slightly larger than the sink’s opening, so make a second outline about 1/2 inches smaller than the original for the hole.
4) Cut the hole with a circular saw or jigsaw while wearing safety goggles and work gloves.
5) Use a power drill if additional holes for the faucet and other accessories are needed.
6) Clean the white porcelain undermount bathroom sink and countertop with denatured alcohol.
 

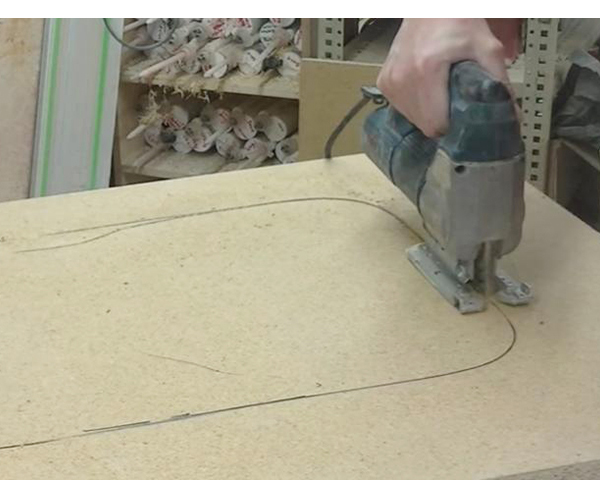
Tip: Given the expense of granite countertops and those made of other materials, as well as the risks of causing damage with improper cuts, strongly consider hiring a professional to cut the hole.


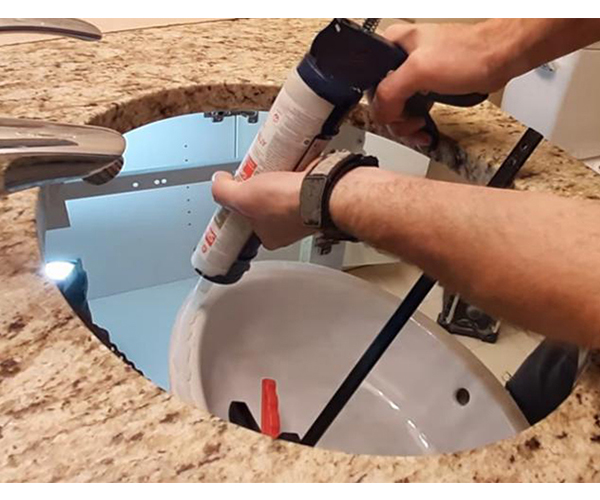
3.Installing a porcelain undermount bathroom sink to an Unattached Countertop

It's easier to install the undermount sink to a countertop before the countertop is attached to the base cabinets. This is particularly useful when attaching a sink with a garbage disposal and a large undermount bathroom sink. You will probably need an additional person to help you turn the countertop.

140x140


1) Confirm clearance on all sides under the countertop before installing the sink. 
2) Flip the countertop so the underside is facing up. 
3) Center the porcelain sink over the hole and trace an outline. 
4) Position sink mounting clips at each corner and at 10-inch intervals along the sides. 
5) Use construction adhesive to glue the sink clip studs in place. Follow instructions for drying time. 
6) Using a caulk gun, apply a thick bead of silicone caulk to the countertop along the inner edge of the outline. 
6) Place the sink down and clip it to the countertop by twisting the wingnuts that come with the clips. 
8) Wipe up excess caulk with a rag and denatured alcohol. Allow remaining caulk to dry for 24 hours or to manufacturer’s instructions. 
9) Turn countertop over and finish installation. Attach faucet fittings, garbage disposal and water supply lines as needed.
 

Tip: The majority of small undermount bathroom sinks only need adhesive to bond them to a vanity counter, but some large or square porcelain undermount bathroom sinks will also use mounting clips. This small metal clip fastens on posts to both the sink and the granite top. Epoxy is used to attach the posts to both materials, then the clip is slipped over them and a small nut is fastened down on each post to hold the clip in place. The epoxy will cure hard enough to fasten the clips onto the posts in approximately 10 minutes, but the clips still need a full 24 hours to dry before the counter is mounted into place.

  
4.Installing an Undermount Bathroom Sink to an Attached Countertop
 
1) When replacing or re-installing a sink, begin by shutting off the water supply, disconnecting all faucet and pipe fittings and removing the old sink. Disconnect the garbage disposal. 
2) Detach any old or small undermount bathroom sink brackets and remove old epoxy with adhesive remover and a scraper
3) Install sink clips to the underside of the counter as needed. 
4) Set up boards (such as  2- x 4-inch boards) underneath the countertop as a stand for the sink. 
5) Use a caulk gun to apply a thick bead of caulk around the edge of the countertop. 
6) Raise the sink so it presses against the underside of the countertop and forms a watertight seal. Add boards and shims as needed to ensure the sink stays in place. 
7) Use the sink clips to attach the sink to the counter. 
8) Wipe up all excess silicone sealant you can reach with a rag and denatured alcohol. Allow remaining caulk to dry for 24 hours or to manufacturer’s instructions. 
9) Remove shims and boards. 
10) Reconnect faucet, drain, pipe fittings and garbage disposal and turn on water supply. 

Tip: It takes time for the sealant to cure, holding the square undermount bathroom sink securely to the underside of the granite. If the counter top is in place when the sink is mounted, gravity may work against the sealant, possibly pulling the small rectangular undermount bathroom sink away from the counter before it has time to dry. Instead, flip the counter upside down on a flat surface and attach the black undermount bathroom sink there. After 24 hours, the counter can be flipped back over and installed on the vanity.

Learning how to install an undermount sink has challenges. But it is not difficult by following my guidelines. Now let’s try!